Showing posts with label cooking. Show all posts

Monday, February 6, 2012

Chocolate Fruit & Nut Drops

I almost forgot the dessert I served at my Bite Size Party! 

A very simple dessert that can be made ahead.  Small discs of chocolate (your choice), pieces of slivered almond, pistachio, dried apricot, and dried cranberry.  I wasn’t happy with my first attempt…

P9250240 They didn’t look bad but I couldn’t get the temp of the chocolate right and they puddled too much and I just didn’t like how they looked.  So then I had a light bulb moment…candy wafers!

I knew that when I melt them on a plate for decorating chocolate molds they don’t lose their shape until you stir them, and they were just about the right size I needed, so I thought I’d give it a try.  It worked beautifully!  P9250243I just placed the wafers on parchment paper and microwaved then until just soft.  Immediately after removing I placed the fruit and nut pieces on each wafer.  Quick and easy!  I made some with milk chocolate, dark chocolate and white chocolate.  The combination of flavors in one bite work very well together and each chocolate tastes slightly different.  All you need is a fancy serving plate and they look very elegant. 

Saturday, February 4, 2012

Bite Size Party

I recently purchased a cookbook, Bite Size: Elegant Recipes for Entertaining by Francois Payard, and it was my inspiration for this party. I also included recipes from Amuse-Bouche: Little Bites Of Delight Before the Meal Begins, and Hors d'Oeuvre at Home with The Culinary Institute of America. Here's the spread....

P9260264 I LOVE the idea of bite-size prepared bites!  I just think it looks so refined.  Doesn’t everyone want to do this at least once in a while?  Don’t get me wrong it was A LOT of work but the end was totally worth it.  Would I do it for every party?  Probably not…but my girlfriends are the best and they deserve it :)

As usual with these parties I tried all new recipes.  Some worked, and some need slight adjustments for next time.  Some will definitely be made again, others…not likely.  But hey that’s what trying new recipes is all about!

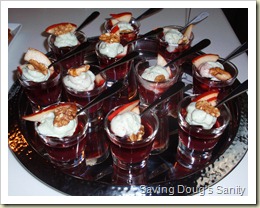
First up, Roquefort Mousse with Port Gelee, Walnuts & Pears.  This was one of those recipes that I had to improvise on the presentation.  The port gelee called for gelatin (which some of you may know is not vegetarian) and three of my guests are vegetarians so I decided to try an alternative.  I did some research and I couldn’t find agar agar P9260249(and didn’t leave myself enough time to order online) so I tried arrowroot.  Well, you can’t really see it in the photo but the gelee did not gel and I ended up with a separated port wine liquid.  It tasted OK so I continued on.  The mousse just sank into the liquid so I decided to precariously perch a small spoon on top of the glass and I piped the mousse on the spoon.  A pear and walnut garnish finish it off.  I learned I’m not a huge fan of Roquefort cheese but the combination of flavors was good. 
Next up…Sesame “Tofu” with Sour Cherry Topping.  I wasn’t sure what this dish would taste like.  A cracker with black and white sesame seeds, a round of sesame “tofu” and P9260250chopped cherry topping.  I love my Chinese spoons and I think this was the perfect appetizer for them.  Each of the components was made ahead and the finished bite was easily put together at the last minute.  The crackers were easy to make and I would make them again.  The “tofu” surprised me and was a smooth texture with a hint of sesame flavor.  The cherries had red wine.  I liked this little bite, the flavors worked really well together I just wish it had a little stronger flavor, everything was very subtle.

Next, was the hit of the party…Crispy Polenta with Pesto and Parmesan.  The recipe called for making each component from scratch but I pre-purchased all of these items and it was fantastic.  Small rounds of polenta fried in olive oil until crispy, a spoonful of pesto and a shave of parmesan.   Who knew something so simpleP9260251 would be so tasty?!  The hardest part was frying the polenta, oil spattered everywhere.  The basil had a little too much olive oil and it soaked through the polenta but they still tasted good.  One of my guest suggested when buying pesto, pour off the oil that separates on the top of the jar before you stir it up.  Good tip, thanks Erika!  That would totally help for next time!  I fancied these up by using a flower cookie cutter to cut the pesto.

P9260253 Another popular dish was the Carrot Soup with Ginger.  Isn’t that a pretty color?  Not your typical carrot soup, the puree was strained so it was very light and the ginger really brightened up the flavor.  When guests ask for the recipe I know they really mean it when they say something tastes good.  It’s always hard to tell if people are just being nice.  Honestly, these are not my personal original recipes so I don’t mind if people say they don’t like something, but I can tell by how many leftovers and recipe requests :)

Next, Shrimp with Apricot-Ancho Barbeque Sauce, another easy P9260254recipe.  The barbeque sauce was made one day ahead and brushed on the shrimp right after broiling.  I thought the sauce was OK and I would make it again.  Would I put it on shrimp? I don’t think so.  Honestly this was probably my least favorite dish of the night, so that’s really all I have to say about it.   

P9260255Finally, Mushroom Ragout with Gorgonzola Cream.  This dish was quite tasty and one I will likely make again.  I think the topping would actually pair well with a steak.  Crostini with shitaki mushrooms, heavy cream, and gorgonzola cheese. The garnish is a fried spinach leaf.  Be careful when frying these they spatter like crazy!  After they are fried they turn translucent and look pretty cool.

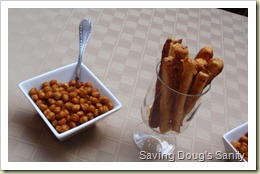
For munchies I made roasted chickpeas and puff pastry sticks.  The chickpeas are a great snack and all the comments I read on the P9260263recipe said to double it, I’m glad I did.  I used canned chickpeas, rinsed and dried them, then coated them with a little olive oil, salt and pepper.  Roasted for about an hour then sprinkled with smoked paprika.  The puff pastry sticks were made with parmesan cheese, half with smoked paprika and half with crushed red pepper.  Anything with puff pastry is always good. 
As I said earlier this was a lot of work but it was also a lot of fun to put together and execute.  One of my guests even said the spread looked like it belonged in a magazine!  Thanks Susan, I really appreciate that.

So that’s my bite size party.  I hope I’ve inspired you to try one of your own.  With a little planning and preparation you can do it!

Friday, March 19, 2010

Ever heard of spoon bread?

Well, I tried a new recipe from my Williams-Sonoma American cookbook...Rosemary Spoon Bread.  It sounded intriguing and I imagined something similar to corn bread.  I have to say this was NOT a success.  Now I just need to figure out what went wrong...

First, I failed to do some research to really understand what spoon bread is.  It is a moist cornmeal based "bread" more like the consistency of pudding or casserole and resembles a cornmeal souffle.  It is a classic element of Southern cuisine and corn, vegetables or cheese are commonly added.  OK, it did look like a souffle as it was baking in the oven, but it never "dried" on the inside.  I may have used a dish that was too deep because the top was golden brown and the inside was like runny scrambled eggs!

Speaking of scrambled eggs...the recipe calls for heating milk, adding cornmeal and cooking on the stove top.  Then you add egg yolks, milk and rosemary.  As soon as I added the egg yolk mixture all I could smell was scrambled eggs.  The eggs did not appear to cook as I added them to the hot cornmeal mixture but maybe they did.  Next time I will try to temper the eggs first and see if that makes a difference.

Next, whipped egg whites are folded into the mixture.  This was fairly straightforward.  I ended up baking this dish for more than double the time stated in the recipe and every time I tested it the skewer came out wet.  I know it shouldn't need to set because the recipe says serve immediately. 

So this could have been a compilation of errors or maybe I just don't like the texture of spoon bread.  Either way, it did smell good and I do think I will try again.  Maybe with a larger pan, cooking the cornmeal on the stove top longer and adding just a little less milk. 

Anyone out there know the secret to spoon bread?

Thursday, March 11, 2010

Cobb Salad

Cobb salads…they look impressive and are so easy to make!


My inspiration was a recipe from my American Williams-Sonoma cookbook. Traditionally, a Cobb salad includes lettuce, tomato, bacon, chicken, hard boiled egg, avocado, cheese, chives and a mustard vinaigrette.

I started by boiling 2 eggs, frying two chicken breasts and cooking 6 slices of bacon.
Cooking tip: I have found a technique, from Betty Crocker, that works great for getting perfect hard boiled eggs. First place your eggs in a single layer in a saucepan and cover with cold water to at least 1 inch above the eggs. Bring to a rolling boil – large bubbles breaking the surface. Cover, remove from heat, and allow to stand for 18 minutes. Immediately drain the hot water and run cool water over the eggs until they are cool enough to handle. You can then place the eggs in the refrigerator or peel and use! For easier peeling of a hard boiled egg start at the large end and run under cold water as you peel.  Always remember to cool your eggs as soon as they are done cooking to avoid that nasty gray/green color on the outside of the yolks.
Next, the vinaigrette….this recipe called for red wine vinegar, sugar, Worcestershire sauce, Dijon mustard, lemon juice, olive oil, garlic, salt and pepper. But you could really use whatever kind of dressing you like.

On to the chopping….per serving of salad I chopped: 1 chicken breast, 1 egg, 3 slices of bacon, 1 tomato and half an avocado. You will notice that my salads did not have avocado. That’s because when I cut my avocado open it was a little too ripe (brown avocado is not appetizing!)

For assembly….A traditional Cobb salad is “composed” meaning the ingredients are placed in quadrants or rows on the plate instead of being tossed. I used romaine lettuce as the base of my salad, but again you could use whatever salad green you prefer. I added the sliced chicken breast, tomato, egg, bacon. Then I sprinkled crumbled blue cheese and chives over the salad. I served the dressing on the side.
Cooking tip: Scissors work great for chopping fresh herbs!
Why not try a traditional Cobb salad for dinner tonight?  Or get creative and add your own twist to it! Don't forget to come back and let us know how your version turned out.

Thursday, February 18, 2010

Chinese New Year

This past Tuesday was Fat Tuesday but we celebrated Chinese New Year!  The Year of the Tiger started on February 14th.  Here are some of the menu items we enjoyed...

Perfect Potstickers - A recipe from Alton Brown.  These are a tasty little purse filled with pork, scallions, red pepper and seasonings.  They can be intimidating but are really very easy to make and cook.  Once you make the filling, set out about 10 won ton wrappers and spoon the filling on the center of each one.  Then you can quickly work through the line brushing the edges of one wrapper, folding and sealing.   Cooking is even easier... heat a skillet (nonstick works best), add a small bit of oil, allow to brown for a few minutes, then add a small amount of chicken broth or water and cover for a few minutes.  They are best when served immediately and dipped in soy sauce.  They look a little funny but are very good.  BTW - I made these the day before, reheated with the same cooking technique and they turned out fine.

Hot Crab Rangoon Dip with Won Ton Chips  - A recipe from Sandra Lee. How can you go wrong with 16oz of cream cheese?  Easy to prepare ahead.  I caught this one just in time, forgot to set a timer and almost left it under the broiler too long!  I think the highlight of this dip is the won ton chips.  They were so easy to make, I just cut the stack of wrappers in half and fried them in bunches for about 10 seconds.  I don't have a fryer so I use my electric fondue pot for frying.  It does an excellent job of keeping the oil at the correct temperature.

Thai Marinated Cucumber Salad - a recipe from Williams-Sonoma.  I was quite worried about this dish!  When I made the dressing the night before the heated rice vinegar smelled SO strong!  The next day it still smelled strong but it didn't taste nearly as strong as it smelled.  This was actually a nice refreshing dish.  Would be good for summertime.  I couldn't find a red jalapeno or chile anywhere so I used some red pepper for color and added two dried/crushed Thai chilies to the dressing.  Not sure what makes this Thai marinated? 

A few store bought items to round out my part of the menu - Fried rice and Vegetable egg rolls.

My guests brought steamed rolls filled with chicken, vegetable lo mien, Buddha's Delight, and sake. 

And for dessert, Tapioca with Coconut Cream, Ginger Almond sugar cookies (both recipes from my Williams-Sonoma Asian cookbook) and green tea cookies (from a guest).  Wow, tapioca takes a long time to cook!  But with brown sugar syrup and coconut cream added it was worth it.  And doesn't it look pretty?  This was a hit, light and refreshing, another great recipe for summertime.  Sorry I can't post the recipes here due to copyrights.

A takeaway gift for each of my guests was a small coin purse made from asian style fabric in which I hid some fun fortunes. 

Good food, good friends, good times! 
Happy Year of the Tiger!

Sunday, January 24, 2010

Chocolate Chip and Pecan Cookies

And for dessert.....


...some awesome cookies!  Again from the Williams-Sonoma American cookbook.  These are a great balance between crispy and chewy.  Use of ground and chopped pecans give them a great overall flavor.  This will definitely be in my recipe box! 

Now for a difficult decision...do I bring them to work to share or keep them all for us?  I don't really need to eat 4 dozen cookies, so I guess I'll share :)

Baking note:  I tried baking half the cookies on baking sheets with silicone mats and the other half on 'air insulated' non stick cookie sheets.  I'm happy to report both cookies cooked the same and were the same darkness.

Beef Tenderloin with Shallot Butter

Another Williams-Sonoma recipe.  The book gives a recipe for steak using a charcoal or gas grill.  We have a tried and true method for searing steaks in a cast iron skillet and finishing in the oven, so I tried the shallot butter.  Basically caramelizing chopped shallot and then mixing with butter.  I've tried herb butter before and they were pretty tasty.  The shallots added a 'grown-up' flavor to the butter and complimented the steak very well.  Would definitely do again as long as I can remember to make it beforehand. 

I added some wild rice and BirdsEye Steam fresh veggies:  Beans with a Twist.  Green and yellow beans with carrots, cranberries and a citrus butter.  You can microwave them in 5 minutes.  Love to have these on hand for a quick side dish.

And of course, a new red wine:  Wine by Joe Pinot Noir.  A perfect match!


Saturday, January 23, 2010

Apple Tasting

Have you ever really tasted different types of apples?  I decided to buy a few different kinds and do some tasting.  I bought Cortland, McIntosh, Crispin, Gala, Empire and Red Delicious.  First I cut each apple in half and tasted the apples raw.  If nothing else this is an excellent exercise to realize the differences between apple textures and flavors.

With the remaining half of each apple I made a simple apple tart.  I used a store bought pie crust placed on parchment paper on a baking sheet.  I visually divided the crust into 6 slices and labeled the parchment around the crust so I could keep the the apples straight.  I sliced the remaining half of each apple into 1/4 thick slices and placed in a row down the middle of each "pie slice."  I then sprinkled sugar over the apples and dotted them with small dices of butter and baked in the oven until done.

I was actually surprised at some notable differences between raw and cooked for some of the varieties.  For example the Cortland seemed to have much more flavor when cooked and the Crispin seemed to have less.  The Red Delicious turned mushy while the McIntosh seemed to stay firmer.

This was a fun experiment for a lazy Saturday morning and I will definitely be repeating this fall during apple season!

Sunday, January 17, 2010

Baked Macaroni and Cheese with Crumb Topping

This dish is from the Williams-Sonoma American cookbook.


I have always had problems making a roux.  I'm not sure what I have been doing wrong but this time it actually worked!  One of the reasons I think it worked this time was that I used whole milk.  Apparently a roux needs the higher fat content to cook properly?  Or at least I don't know how to adjust for using lower fat milk, but I have heard chefs say you should use whole milk for dishes like macaroni and cheese.  Another reason I think it worked is that I heated the milk to simmering before I added it to the butter/flour mixture.

The mix of extra sharp cheddar cheese and monterey jack was perfect.  The crumb topping added just right amount of crunch.  Would I make it again? Definitely!  The only thing I would do differently is add a little more hot sauce, I think I was too cautious and we could hardly taste it.  Next time I might try the recipe variation which adds mushrooms to the dish.  Yummy!

This dish receives 2 thumbs up.  Now I must go finish my glass of wine...

Williams-Sonoma Cookbooks

Williams-Sonoma has a collection of cookbooks where each book focuses on a different type of food or cuisine.  A few years ago I purchased Mexican, Italian, and French.  They have been great inspiration for my themed menus.  Each book starts with a chapter called "The Classics" which includes recipes that anyone would consider traditional recipes for that food or cuisine.  Then chapters on starters, main courses, soups, veggies, desserts, etc follow.  EVERY recipe shows a beautiful color photograph of the completed recipe, one of the reasons I love this collection.  A few weeks ago I ordered Asian, American, and Hors d'ouevre and was again inspired.

After recently watching the movie Julie and Julia, I liked the idea of trying to cook my way through a cookbook.  But which one?  After receiving Williams-Sonoma American and reading the table of contents I thought... This might be a good book to cook through.  With recipes like Baked Macaroni and Cheese with a Crumb Topping, Blue Plate Meatloaf with Mushroom Pan Gravy, Cream of Tomato Soup, Buffalo Chicken Wings, New England Lobster Dinner, Yankee Baked Beans with Apple Cider, Wild Rice Pilaf with Dried Cranberries and Pistachios, Artichokes with Garlic-Basil Mayonnaise, Baked Acorn Squash with Pineapple-Mustard Glaze, Spiced Apple Pie, and Sour Cherry Pie, how could I go wrong?  All great recipes.  Some of these recipes are simple and some are more complex, and there isn't really a focus on low-fat or anything like that.  But why not learn how to cook some American classics?!

So my goal is to cook at least one recipe from this cookbook each week.  I won't be able to post the full recipes here due to copyrights but I'll share with you how they turn out and what I learn along the way.

Wednesday, December 16, 2009

An Attempt at Spinach Phyllo Triangles


Now I know you're probably saying "Those don't look like triangles".....and you would be correct! 

I did start to make triangles, and I actually made three.  I started with 6 layers of phyllo dough, cut it into strips and put a small amount of filling at one end.  I tried to fold the phyllo into triangles (like folding an American flag) but first I had to remove some filling, and I still couldn't get it to fold properly.  Sorry, I should have taken pictures to demonstrate my failed attempts.  I decided to bake the three that I made because the corners weren't sealing and I was afraid the filling would just run out.  They baked up fine.  The filling set OK and the phyllo dough was light and flaky. 

The problem?  The ratio of filling to phyllo, not enough filling.  I could have tried less layers of phyllo but I decided this would take some playing around with, so I ran to the store and purchased the already made phyllo cups to add my filling to.  That's how I ended up with what you see here.

I'll have to work on perfecting the triangles and I'll be sure to let you know what works best! 

Sunday, December 13, 2009

Hummus Stuffed Portobello Caps

Hummus Stuffed Portobello Caps


Ingredients
 
2 tablespoons olive oil
6 small portobello mushroom caps, stems and ribs removed
1/2 cup cream cheese, softened
1/2 green bell pepper, diced
3/4 cup roasted red pepper hummus
salt and pepper to taste
1 teaspoon lemon pepper seasoning
 
Directions
 
1. Preheat oven to 375 degrees F (190 degrees C).
 
2. Heat olive oil in a large skillet over medium-high heat. Sear the portobello mushrooms for 3 minutes on each side until browned.
 
3. Stir together cream cheese, green pepper, and hummus until evenly blended. Season the mushroom caps with salt and pepper on each side. Place the mushrooms onto a baking sheet, with the stem-side facing up. Sprinkle with lemon pepper, then fill with hummus mixture.
 
4. Bake in preheated oven for 15 minutes until the filling is hot.
 
My Comments & Tips
  • The filling was prepared the day before the party.
  • I also wiped the mushroom clean and removed the stems the day before and stored them in a paper bag in the refrigerator overnight.
  • I purchased baby portobello mushrooms for this recipe.  I doubled the filling and filled almost 30 mushrooms with TONS of filling left over!  So either I purchased the wrong size mushrooms or somehow I didn't use enough filling. 
  • I tried the extra filling on some crackers the next day and it was a very tasty spread.
  • These were very easy to make.  I seared the mushrooms, allowed then to cool a bit, then filled them and kept them at room temperature (only about an hour) until I baked them. 
  • Best served hot.

Friday, December 11, 2009

Caesar Salad Spears

Caesar Salad Spears

A classic Caesar turned into a clever finger food!


Ingredients

2 cups 1/4-inch-diced white bread
1/4 cup extra-virgin olive oil
Kosher salt and freshly ground pepper
3 anchovy fillets, mashed
1 small garlic clove, smashed
1/4 cup mayonnaise
1/2 teaspoon finely grated lemon zest
2 tablespoons fresh lemon juice
1/4 cup freshly grated Parmigiano-Reggiano cheese, plus more for garnish
7 Belgian endives

Directions

Preheat the oven to 350°. In a medium bowl, toss the bread with 2 tablespoons of the olive oil and season with salt and pepper. Spread the bread on a baking sheet and toast for about 10 minutes, stirring once, until golden and crisp.

Meanwhile, in the same bowl, using a spoon, mash the anchovies to a paste with the garlic and a pinch of salt. Whisk in the mayonnaise, lemon zest and lemon juice, then whisk in the remaining 2 tablespoons of olive oil and season with salt and pepper. Stir in the 1/4 cup of grated cheese.

Trim the endives and remove the 60 largest leaves from 6 of the heads. Stack the leaves and trim them to about 4 inches. Thinly slice the remaining endive, along with the trimmings of the 6 other heads (you should have about 3 cups), and toss with the dressing. Spoon the salad onto each spear and garnish with the croutons and grated cheese. Serve immediately.

My Comments & Tips
  • Very clever idea!  These were a hit! 
  • I will confess I used store bought croutons.  Hey, I'll take help where ever I can when I'm sure it won't compromise the dish! 
  • I left out the anchovy fillets to make the dish vegetarian and the dressing was still very tasty.
  • These were fast and easy to prepare.
  • The only thing I would do differently next time is make sure I have extra endive.  The heads I bought were kind of small and the filling turned out to be less leafy and more crunchy.

Sausage Stuffed Peppadews

Sausage-Stuffed Peppadews


Ingredients
1 pound hot Italian sausages, casings removed
1/2 cup cooked white rice
2 tablespoons olive tapenade
60 yellow or red peppadew peppers (from two 14-ounce jars), drained
2 tablespoons extra-virgin olive oil
2 tablespoons freshly grated Parmigiano-Reggiano cheese

Directions
Preheat the oven to 450°. In a medium bowl, knead the sausage meat with the cooked rice and olive tapenade. Fill the peppadew peppers with the meat mixture, pressing to compact it. Arrange the peppadews meat side up on a lightly oiled baking sheet; lightly press down on them so they don't wobble. Drizzle the peppadews all over with olive oil and sprinkle with the grated Parmigiano-Reggiano cheese.

Bake the peppadews in the upper third of the oven for about 15 minutes, until the sausage meat is cooked through. Transfer the peppadews to a platter and serve warm or at room temperature.

My Comments & Tips
  • I will admit I had no idea what a peppadew was when I read this recipe.  (FYI - Peppadew is actually a trademarked brand name for sweet piquante peppers.)  I envisioned something similar to a pepperoncini.  They are quite different, they resemble cherry tomatoes (there is a yellow version too) and taste slightly sweet.  I may look for some new recipes to try these tasty peppers again!  I found them on the olive bar at my local Wegman's, both the red and the yellow variety. 
  • I browned the sausage before preparing the filling, I was hoping to reduce the amount of grease in the peppers and I wasn't confident that 15 minutes would be enough time to make sure the sausage was fully cooked.
  • I halved this recipe and still had almost half of the filling left after stuffing over 30 peppers.
  • I had so mmuch filling leftover that I decided to stuff some pepperoncini's as well.  These had a little more zing to them but turned out good too.
  • I prepared the filling and stuffed the peppers one day ahead.  They were stored in the refrigerator and brought to room temperature before I cooked them.
  • I will admit, I forgot to add the parmesan cheese.  Sometimes that happens when I prepare items ahead of time.  They still tasted yummy!
  • These tasted fine at room temperature.
  • I used the hot sausage but I may consider using a different kind next time.  They had a little kick, but you really couldn't taste any sausage flavor.

Tomato Tartlets

Tomato Tartlets


Ingredients
All-purpose flour, for rolling
1/2 pound all-butter puff pastry
30 cherry tomatoes (about 1 pound), halved crosswise
2 tablespoons extra-virgin olive oil
2 teaspoons fresh thyme leaves, plus more for garnish
Kosher salt and freshly ground pepper
1/2 pound fresh ricotta

Directions
Preheat the oven to 425° and line a large baking sheet with parchment paper. Position racks in the middle and upper thirds of the oven. On a lightly floured surface, roll out the puff pastry to a 9 1/2-by-17 1/2-inch rectangle. Using a straight edge, trim the pastry to a 9-by-17-inch rectangle. Transfer the pastry to the baking sheet and poke all over with a fork. Top with another sheet of parchment and another baking sheet and bake for 25 minutes on the middle rack, until golden. Remove the top sheet and parchment paper and bake the pastry until lightly browned and dry, about 10 minutes longer. Slide the paper and pastry onto a rack and let cool.

Meanwhile, in a large bowl, toss the tomatoes with the olive oil and 2 teaspoons of thyme and season with salt and pepper. Place the tomatoes on a baking sheet, cut side up, and bake on the upper rack for about 15 minutes, until softened slightly. Let cool.

In a food processor, puree the ricotta until very creamy. Spread the ricotta over the pastry and season with salt and pepper. Arrange the tomatoes cut side up on the ricotta in 5 rows of 12. Sprinkle lightly with fresh thyme. Using a long knife, cut the pastry between the tomatoes into 60 squares. Transfer the tartlets to platters and serve at once.

My Comments & Tips
  • Isn't the purpose of puff pastry to puff?  This was the first time I used the two baking sheet method to bake the puff pastry flat.  One very important tip - DO NOT use air bake cookie sheets to do this!  I don't know if all air bake cookie sheets are the same, but mine have 1 small hole on the bottom of each corner.  I think this caused hot air to flow between the cookie sheets and burn my first attempt!  I should have checked earlier but by 25 minutes the pastry was very dark brown.  It's a good thing there are two sheets of puff pastry in each box!  For the second attempt I actually used two baking sheets (aka jelly roll pans) and it turned out fine.  But I did check it after 15 minutes this time.
  • Cutting a tomato crosswise means not through the stem.  The ones I did this way deformed when roasting.  You will essentially want the top and bottom of the tomato.  I know this sounds silly but how was I supposed to be sure what crosswise meant? 
  • The tomatoes smell divine after roasting in the oven!
  • I prepared the puff pastry and tomatoes early to allow them to cool. 
  • Creaming the ricotta in the food processor made it super smooth and creamy!  Nice change of texture for ricotta.
  • A  pizza cutter worked great for cutting the pastry.
  • A tasty treat!

Thursday, December 10, 2009

Gorgonzola and Caramelized Onion Appetizer

Gorgonzola and Caramelized Onion Appetizer

Crunchy baguette slices are topped with robust Gorgonzola and sweet caramelized onions.


Ingredients
1 tablespoon butter or margarine
3 medium onions, chopped (1 1/2 cups)
2 teaspoons packed brown sugar
1/2 teaspoon balsamic or red wine vinegar
16 slices (1/2-inch-thick) baguette-style French bread (from 10-ounce loaf)
3 tablespoons crumbled Gorgonzola cheese

Directions
Melt butter in 7-inch skillet over medium heat. Cook onions, brown sugar and vinegar in butter 20 to 25 minutes, stirring frequently, until onions are golden brown.

Set oven control to broil. Place baguette slices on ungreased cookie sheet. Broil with tops 4 to 6 inches from heat 1 to 2 minutes or until lightly toasted.

Spoon about 1 teaspoon caramelized onions evenly onto each baguette slice. Sprinkle with 1/2 teaspoon of the cheese. Broil about 1 minute or until cheese is melted.

My Comments & Tips
  • I chopped 3 medium onions and ended up with WAY more than 1 1/2 cups, I would say it was more like 3 cups. They did however reduce quite a bit in volume after cooking.
  • I tripled the amount of brown sugar and balsamic vinegar because it just didn't look like enough while cooking.
  • The onions took at least an hour to cook.  Having caramelized onions before I knew they should be cooked slowly, so I resisted the urge to increase the temperature.  Maybe it was my onions (I used sweet onions) but there seemed to be a lot of water released from them, and they didn't start to caramelize until that cooked off.  The last recipe I had for caramelized onions took about 3 hours, so this wasn't too bad.  The trick is to be patient, you don't want to saute them.
  • I prepared these one day ahead and reheated them slowly on the stove.  They turned out fine.
  • The recipe says to chop the onions. The onions in the picture on the website appeared to be sliced thinly, so I cut the onion in half and sliced it from there. Although the texture was fine, eating them was a little tricky! It was difficult to bite the baguette without the strings of onions falling off. Next time I will actually chop them in squares or at least smaller slices.
  • I ended up with about 25 pieces, and still had about a 1/2 cup of onions left over. I'm looking forward to trying them on a homemade burger!
  • I was able to assemble these about 15 minutes before broiling, I didn't want the bread to get soggy.
  • These were also good at room temperature.